Great photography relies on more than just skill and vision. The condition of your gear plays a huge role. Consistent upkeep is essential for any photographer who wants their equipment to perform at its best.
Proper camera maintenance is about protecting your investment. It ensures peak performance and stunning image quality for years. This routine care directly extends the operational life of your device.
Industry leaders like Nikon recommend professional inspections every one to two years. This is especially wise in places like Singapore, where high humidity can affect electronics. Adapting your routine to local environmental factors prevents major issues.
Think of this care as an investment in your photography journey. A well-maintained tool is a reliable one, always ready to capture your creative vision without fail.
Key Takeaways
- Regular camera maintenance is crucial for optimal performance and photo quality.
- Proactive care prevents small problems from becoming expensive repairs.
- Manufacturers like Nikon suggest a professional check-up every 1-2 years.
- Your maintenance routine should adapt to your local environment, such as Singapore’s humidity.
- Investing time in care protects your financial investment and extends your gear’s life.
- Maintenance encompasses simple daily habits and more involved professional servicing.
- A well-cared-for camera is a dependable tool for capturing decisive moments.
Understanding Why Camera Maintenance is Non-Negotiable
Your camera is a precision instrument. Like any fine tool, its longevity hinges on regular, attentive care. Skipping this routine is a direct risk to your craft and investment.
Environmental factors are a relentless threat. In humid climates like Singapore’s, moisture seeps into seals. This can cause internal corrosion and foster mold on lens elements, ruining image quality.
Dust and dirt are more than just nuisances. They grind against moving parts and insulate electronics, causing overheating. A single grain can permanently scratch a sensor or lens.
A clean camera is the foundation of flawless photos. Smudges and dust spots create flaws software cannot fully fix.
This maintenance is a preventative investment. The small amount of time spent on cleaning and checks saves significant repair costs later. It keeps your equipment working well.
Regularly check camera components for early warnings. A loose connection or worn seal caught early prevents a catastrophic failure during a crucial shoot.
This diligent camera care adds years of service. It maximizes your gear’s value and ensures it’s always ready. For a photographer, this discipline is as vital as knowing composition.
This principle applies to all gear. From professional DSLRs to compact models, every device needs protection to perform. Understanding this “why” is the first step to mastering the “how.”
Do Cameras Need Maintenance? The Direct Answer and Its Impact
Statistics and expert advice converge on a clear verdict regarding equipment care. The answer is a definitive yes. Consistent upkeep is not optional for anyone serious about their craft.
This commitment directly influences every photo you take. It protects your financial investment and ensures reliable operation.
The Tangible Benefits of a Regular Maintenance Routine
A structured care plan delivers measurable advantages. Your gear maintains its original optical and mechanical precision.
Autofocus remains swift and accurate. Aperture blades function smoothly for perfect exposure control.
The sensor stays clear, which is foundational for flawless image quality. This proactive approach is far more economical than major repair bills.
Industry data suggests a staggering 95% of common damage stems from simple neglect. A small amount of time spent on care prevents this.
Experts often recommend a professional service for DSLR models about once a year. This check-up can spot minor issues before they escalate.
Your equipment also holds its value remarkably well with documented maintenance. A history of professional servicing makes it more attractive to future buyers.
Ultimately, a well-kept tool performs when it matters most. You avoid frustrating error messages and glitches during critical shoots.
This reliability lets you focus entirely on creativity. Your camera becomes a trusted partner, always ready to perform.
How Neglect Directly Harms Image Quality and Performance
Skipping routine cleaning has immediate visual consequences. Sensor dust is a prime example.
Studies show 88% of photographers encounter spots from dust on their images. These appear as blurred or dark marks, especially at small apertures.
Neglecting your lens leads to persistent smudges and haze. This film drastically reduces contrast and sharpness.
Your photos will look soft and lack detail. No amount of editing can fully restore lost image quality.
Environmental exposure accelerates wear. Salt air or high moisture without proper aftercare causes corrosion.
Electrical contacts and metal parts can degrade. This leads to communication errors between your camera and lenses.
Mechanical systems suffer without attention. Shutters can become sluggish, and apertures may stick.
These failures often happen at the worst possible moment. The cost to fix such damage is much higher than preventive maintenance.
Regular checks help you keep camera components in top shape. You identify problems early and address them.
This diligent camera care makes your gear last longer. It will continue working well for years, supporting your photography journey.
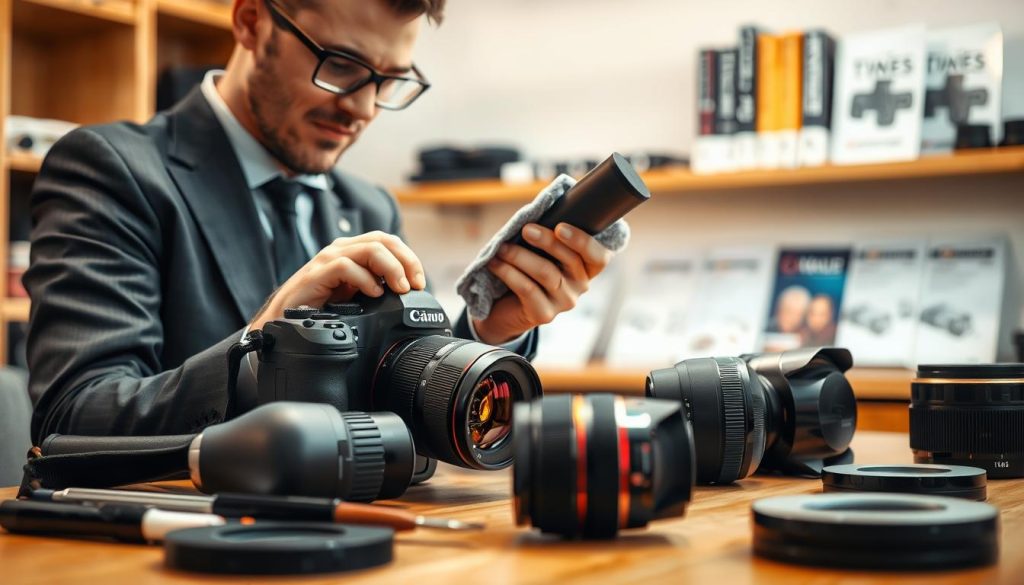
Assembling Your Camera Cleaning Toolkit
Proper cleaning starts with a dedicated kit, designed specifically for delicate photographic gear. Using the correct implements protects your investment and ensures flawless results.
This toolkit is your first line of defense against dust, dirt, and smudges. It makes the process safe, efficient, and effective.
Essential Tools for Safe and Effective Cleaning
A complete kit contains specialized items for each task. These tools prevent scratches and other damage during cleaning.
- Rocket Blower: This bulb blower removes loose dust from your lens and body without any contact. It is the safest first step.
- Microfiber Cloth: Use a high-quality, lint-free cloth reserved only for optics. Gently wipe in a circular motion from the center outward.
- Soft Brush: A clean, soft-bristled brush clears dirt from camera crevices and external parts.
- Lens Cleaning Pen: This two-sided tool has a soft brush for dust and a microfiber pad for gentle cleaning.
- Pre-moistened Wipes: Brands like Zeiss offer safe, single-use wipes for lenses and screens.
For sensor maintenance, use manufacturer-approved fluid and swabs. This is a delicate procedure requiring the right equipment.
What to Avoid: Cleaning Products That Cause Damage
Knowing what not to use is just as important. Common household items can ruin delicate coatings and mechanics.
Avoid compressed air cans completely. They can propel moisture and debris deep inside your gear. In worst cases, they can freeze and harm the sensor.
Never use paper towels, facial tissue, or your shirt. These contain abrasive fibers that scratch lens elements permanently.
Harsh chemicals are a major threat. Generic glass cleaners, alcohol, or acetone can dissolve anti-reflective coatings. This destroys image quality.
Also, avoid using excessive breath to fog a lens for cleaning. Saliva residues are acidic and can degrade coatings over time.
Sticking to your dedicated toolkit is the best camera care. It is the surest way to clean your camera safely and keep it performing.
Step-by-Step Guide to Camera Cleaning Essentials
The clarity of your final image begins with the cleanliness of your gear. Following a structured method protects your investment and ensures peak performance. This guide walks you through three critical areas.
Each procedure uses tools from your dedicated kit. Always work in a clean, dust-free area. Patience and the right technique prevent damage.
How to Safely Clean Your Camera Lens
Lens cleaning is a foundational skill. Fingerprints and dust are the main enemies of image quality. A safe routine removes them without harm.
Follow these steps in order:
- Blow First: Use a rocket blower to remove loose, abrasive grit. Never wipe a dry, dusty surface.
- Apply Fluid to Cloth: Put one drop of lens-specific fluid on a microfiber cloth wipe. Never apply liquid directly to the glass.
- Wipe Gently: Use a gentle, circular motion. Start from the center and move outward. Use a clean cloth section for each pass.
- Don’t Forget the Ends: Clean the rear element and filter threads. These areas affect mounting and sharpness.
For stubborn smudges, a dedicated solution works best. This regular cleaning habit make sure your lenses stay in top shape.
Cleaning the Camera Sensor: A Delicate Procedure
Sensor cleaning is an advanced task. Dust here creates visible spots in your photos. Approach with extreme caution.
First, use your camera’s built-in cleaning function. This vibration often dislodges loose particles. For stubborn specks, manual cleaning is next.
Inspect the sensor with a magnifying loupe. Identify the dirt location. Ensure the battery is fully charged. A power loss during the process can cause shutter damage.
Use a single-use sensor swab with a drop of Eclipse fluid. Follow the swab instructions for a single, smooth stroke. Never apply pressure or scrub.
“When in doubt, seek a pro. Sensor cleaning is one area where professional service is a wise investment for long-term camera care.”
If you are hesitant, a trusted professional camera service in Singapore can handle this safely. This protects your equipment and your peace of mind.
Wiping Down the Camera Body and External Components
External cleaning maintains aesthetics and function. It prevents grime from entering sensitive parts.
Start with a soft, dry brush. Gently dislodge dirt from buttons, dials, and the viewfinder. This simple step keep camera controls working well.
Next, use a slightly damp microfiber cloth. Wipe down the camera body, but avoid all ports and openings. This removes oils and general grime.
For the LCD screen, use a dedicated screen cleaner or a barely damp cloth. Dry it immediately to prevent moisture issues.
Finally, check camera contacts. Use a dry cotton swab on battery terminals and memory card slots. This ensures good electrical connections.
This full-body wipe-down is a key part of your maintenance routine. It helps your gear last longer and look professional.
Implementing Proper Storage Techniques for Longevity
Protecting your investment from environmental threats requires a dedicated storage strategy. How you store camera gear between shoots is a cornerstone of long-term camera care.
This proactive approach prevents many common issues before they start. It directly extends the useful life of your equipment.
Effective storage involves two key aspects. You need physical protection during transport and precise environmental control for long-term rest.
Choosing the Right Camera Bag for Protection
Your camera bag is a mobile fortress. The right one absorbs shocks and shields your equipment from the elements.
Look for these essential features:
- Customizable Padding: Dividers should snugly fit your specific body and lenses. This prevents internal movement that causes impact damage.
- Weather-Resistant Materials: Nylon with a PU coating offers great protection. It guards against sudden rain or accidental spills during your shoot.
- Dedicated Tech Compartment: A padded slot for a laptop or tablet is invaluable. It keeps all your editing tools secure in one bag.
- Ergonomic Design: Comfortable shoulder straps and back support are crucial. Quick-access compartments save you time and keep your gear organized.
A well-chosen bag is a fundamental maintenance tool. It helps keep camera components safe from daily knocks and scrapes.
Moisture Control and Temperature Considerations in Storage
Humidity and heat are silent enemies of electronics. Controlling your storage environment is non-negotiable for longevity.
The ideal conditions are a consistent, cool temperature around 20°C (68°F). Relative humidity should stay between 40% and 50%.
In a humid climate like Singapore’s, a dedicated electronic dry cabinet is the best solution. It provides precise, automatic humidity control for your valuable gear.
For a more budget-friendly option, use silica gel packs or rechargeable desiccants. Place them inside a sealed plastic storage box with your equipment.
Avoid storing gear in attics (too hot), basements (too damp), or cars. Extreme temperatures and fluctuations can warp parts and damage seals.
For long-term storage, always remove the battery. This prevents potential leakage and terminal corrosion.
Following these tips will help your gear last longer. A stable environment ensures everything works well when you’re ready to shoot.
Smart storage is the final, critical step in your camera maintenance routine. It safeguards your cleaning efforts and keeps your lens free from dust and mold.
This discipline protects you from costly repair or service bills. It gives you confidence that your camera will be ready to perform.
Establishing a Practical Maintenance Schedule
The best maintenance strategy is one you can stick to without it feeling like a chore. A clear schedule transforms care from an occasional task into a reliable habit. This structure helps you keep camera gear in top shape and running smoothly.
Consistent routines prevent small issues from becoming major repair headaches. They also ensure your equipment is always ready to perform. Let’s break down a practical plan into manageable daily, weekly, monthly, and quarterly tasks.
Daily and Weekly Quick-Check Habits
These fast routines should become second nature. They take less than a minute but are critical for catching problems early.
Before and after every shoot, run a quick visual and functional check:
- Inspect the front and rear lens elements for fingerprints or smudges.
- Check the camera body for obvious dirt or debris.
- Ensure the battery has a charge and your memory card has free space.
Make this a weekly habit: give your gear a gentle blast with a rocket blower. This removes loose dust accumulated from regular use.
Also, check camera and lenses are stored correctly. Verify all body and lens caps are secure when not in use. Storing everything in its bag provides an extra layer of protection.
These simple steps make sure your equipment works well for every session. They are the foundation of good camera care.
Monthly and Quarterly Deep-Cleaning Tasks
Some cleaning doesn’t need to be daily. Schedule these more involved sessions to maintain peak performance.
Set a monthly reminder for a “deep clean.” This involves a thorough external wipe-down of the body and all lenses with a microfiber cloth. Carefully clean the viewfinder eyepiece and LCD screen. Inspect all accessories like straps and remotes for wear.
Every quarter (three months), add a critical sensor inspection to your monthly routine. Use your camera’s manual cleaning mode to lock up the shutter. Examine the sensor with a magnifying loupe for any stubborn spots.
This quarterly check is also the perfect time to update your camera’s firmware. Calibrate lenses if needed and thoroughly organize your camera bag.
Integrate the annual professional service recommendation into this schedule. Think of it as the capstone of your personal maintenance plan. A pro provides a comprehensive mechanical and optical inspection you can’t do yourself.
Following this structured approach helps your gear last longer. It protects your investment and ensures reliable performance for years. A little time invested regularly saves a lot of time and money later.
Protecting Your Gear from Singapore’s Climate and Other Elements
Singapore’s weather demands specific strategies to safeguard your gear. Environmental factors like humidity, rain, dust, and salty air can damage equipment. Proactive measures are essential for long-term camera care.
Adapting your routine to local conditions prevents many common issues. This approach helps your equipment last longer and maintain peak performance.
Managing High Humidity and Preventing Mold
Persistent high humidity above 60% encourages fungal growth inside lens assemblies. Mold can form between glass elements, leading to permanent etching and haze. This directly ruins image quality.
The absolute necessity for long-term storage is a dry cabinet. Set it to 40-45% relative humidity to create a mold-inhibiting environment. This controlled space is your best defense.
When shooting in humid conditions, use large silica gel canisters in your bag. Replace or recharge them frequently to absorb excess moisture. This simple step keep camera internals dry.
Allow your gear to acclimatize slowly when moving between spaces. Going from heavily air-conditioned rooms to the humid outdoors too quickly causes internal condensation. Let it adjust in a sealed bag first.
These tips help you avoid costly repair bills from corrosion. They make sure your camera stays working well in tropical climates.
Shielding Equipment from Rain, Dust, and Salty Air
Outdoor shooting requires extra protection from the elements. Invest in a dedicated rain cover or even a disposable shower cap for sudden downpours. This keeps your camera operational in wet weather.
Use clear protective filters like UV or skylight types on your lenses. They act as a sacrificial front element. This shields the expensive lens coating from salt spray, sand, and scratches.
After beach shoots or dusty environments, clean your gear carefully. First, use a blower to remove abrasive sand and salt crystals. Never wipe these particles directly, as they cause damage.
Next, gently wipe down the entire body with a slightly damp cloth. Pay attention to buttons and dials where dirt can accumulate. This post-shoot routine catches problems early.
Lens hoods provide more than flare control. They are a physical barrier against rain splashes and minor impacts. Always attach them when shooting outdoors for added protection.
Choosing the right mounting spot also helps. Position your setup under eaves or awnings to avoid direct rain. Use outdoor-rated cables and add silicone caps for extra moisture protection.
These practices shield sensitive parts from environmental damage. They contribute to your gear’s overall life and running smoothly. Consistent care in challenging conditions is key.
Recognizing the Signs Your Camera Needs Professional Attention
Subtle changes in your equipment’s behavior often hint at underlying issues that demand technical expertise. Knowing when to handle a problem yourself and when to seek help is a vital part of responsible ownership.
This awareness helps you keep camera gear in top shape. It also prevents minor faults from escalating into major repair scenarios. Learning these signs protects your investment and ensures consistent performance.

Identifying Common Mechanical and Optical Issues
Some problems have clear symptoms. Consistent autofocus inaccuracy, even after calibration, points to internal misalignment. Unusual grinding or sticking sounds from the shutter or focus motor are red flags.
Error codes that persist after removing the battery suggest deeper electronic faults. Physical damage, like dents or cracks on the body or lens barrel, often compromises environmental seals.
To test for sensor issues, take a photo of a plain, bright surface. A clear sky or white wall at a small aperture like f/16 will reveal any dust spots or stains. These appear as dark, out-of-focus blobs in your images.
Other symptoms include viewfinder blackouts, dead pixels on the LCD, or inconsistent exposure between shots. Any problem affecting the core function of capturing a sharp, correctly exposed photo is a candidate for professional service.
Addressing these issues early is key to maintaining image quality. It make sure your gear continues working well for every shoot.
When DIY Fixes Are Not Enough: Time for a Pro
There is a clear boundary between user care and expert repair. Any task involving the sealed chassis, internal disassembly, or soldering should be left to certified technicians.
If a simple sensor cleaning with a blower or swab fails to remove persistent spots, professional cleaning is needed. Attempting further yourself risks causing micro-scratches.
For lens calibration, if micro-adjustments in-camera don’t solve focus issues, seek a pro. Optical bench realignment is often required for precise correction.
An annual professional check-up is a wise practice for heavy users. This preventative service ensures all components are within specification, even without obvious symptoms.
Timely intervention saves money and time in the long run. It extends the operational life of your equipment and guarantees it works well when you need it most.
Essential Accessories for Proactive Camera Care
Beyond cleaning kits, specific tools offer constant defense against wear and environmental threats. The right accessories work silently in the background. They provide ongoing protection with minimal impact on your shooting.
This proactive approach is a core part of smart camera care. It helps you keep camera gear in camera top condition. Investing in these items prevents common issues and saves time and money on future repair.
Protective Filters and Caps
These simple items form a vital physical barrier. They shield your most expensive equipment from daily hazards.
Always use a high-quality, multi-coated UV or clear filter on every lens. This filter acts as a sacrificial front element. It takes the hit from scratches, salt spray, and accidental impacts.
Replacing a scratched filter is far cheaper than fixing a lens front element. This is one of the easiest tips to prevent physical damage.
Never forget the rear cap and body cap. When a lens is not mounted, these caps create a sealed system. This simple habit keeps dust out of the mirror box and off the sensor.
Lens hoods provide a double benefit. They improve image contrast by blocking stray light. They also physically shield the front element from bumps, fingers, and direct rain.
For extra protection within your bag, consider soft lens pouches. They cushion individual lenses and prevent them from scratching each other.
Moisture-Absorbing Solutions for Storage
Controlling humidity is non-negotiable for long-term gear health. In Singapore’s climate, these accessories are essential for proper storage.
Silica gel packs are a classic and effective solution. Place them in your camera bag or storage box to absorb ambient moisture. For a more sustainable option, use rechargeable desiccant units.
Brands like Eva-dry have color-changing beads. You reactivate them in a microwave or oven when saturated. This provides continuous camera care.
Combine desiccants with an airtight plastic container. Cases with O-ring seals, like those from Pelican, create a portable dry box. This setup is perfect for travelers or as a secondary store camera solution.
The ultimate accessory for a serious photographer in a humid region is a dedicated dry cabinet. It offers precise, automatic humidity control, giving you complete peace of mind for your equipment.
For short-term protection during very damp outings, use anti-humidity bags. These zip-lock style bags with special liners can be tossed in your camera bag. They offer an extra layer of defense against sudden weather changes.
Using these solutions will make sure your gear is safe from mold and corrosion. This proactive step is key to helping your investment last longer.
Navigating Professional Servicing vs. DIY Maintenance
Not every camera issue requires a trip to the shop, but recognizing which ones do can save you from costly mistakes. A smart approach to camera maintenance involves knowing your own limits and when to call in an expert.
This balance protects your investment and ensures peak performance. Let’s define the safe scope for do-it-yourself tasks and outline when professional service is the wiser choice.
Tasks Perfectly Suited for DIY Enthusiasts
Many aspects of camera care are well within a careful owner’s ability. These routines form the backbone of preventative maintenance and help you catch problems early.
Your core DIY responsibilities include all external cleaning. Safely wipe down the camera body, LCD screen, and viewfinder with a microfiber cloth. Clean lens elements using proper fluid and technique to preserve image quality.
For sensor dust, start with your camera’s manual cleaning mode and a rocket blower. Confident users can proceed with wet cleaning using approved swabs, following instructions meticulously.
Other effective at-home tasks include:
- Updating your camera’s firmware for improved function and bug fixes.
- Cleaning battery and memory card contacts with a dry swab.
- Using in-camera micro-adjustment features to fine-tune lenses if focus is slightly off.
- Performing routine inspections of rubber grips, buttons, and dials for wear.
- Tightening any loose screws on the body or lens mount.
This regular cleaning and checking habit helps keep camera gear running smoothly. It is a great way to understand your equipment better.
When and How to Choose a Reliable Service Provider
Some issues demand specialized tools and certified expertise. Knowing when to seek professional service prevents further damage and ensures a proper fix.
Complex internal problems are clear signals. These include a failing shutter mechanism, grinding autofocus motors, or persistent electronic error codes. Optical issues like misaligned lens elements also require a pro’s bench.
“If a simple sensor cleaning doesn’t remove spots, or you see haze inside a lens, stop. Further DIY attempts often make the repair more expensive.”
Choosing the right shop is critical. Start by looking for an authorized service center for your brand. This guarantees genuine parts and trained technicians.
Always vet a provider’s reputation. Check online reviews and ask about technician certifications. A reputable shop will provide a written estimate before any work begins.
This estimate should detail labor, parts, and the scope of service. It’s also wise to ask if they provide a detailed report upon completion. This documentation is valuable for your records and future resale value.
Investing in professional repair for major issues extends your gear’s life. It make sure complex damage is corrected, so your camera works well for years.
Combining diligent DIY habits with timely expert intervention is the ultimate strategy. This approach maximizes performance, protects your finances, and helps your investment last longer.
Advanced Care: Firmware Updates and System Checks
Think of your camera’s firmware as its digital brain, quietly directing every function from autofocus to file saving. This embedded software is a critical part of modern camera care. Keeping it updated is a powerful, yet often missed, maintenance step.
This advanced care goes beyond physical cleaning. It ensures your equipment operates with the latest intelligence and stability. Regular system checks complement this by verifying all parts work well.
The Importance of Keeping Your Camera’s Software Current
Firmware is the permanent software programmed into your camera’s hardware. Manufacturers release updates to fix bugs, improve performance, and sometimes add entirely new features.
An update might introduce animal-eye autofocus to an older model. Another could solve a memory card compatibility issue. These upgrades can feel like getting a new camera without the cost.
Neglecting these updates is a common oversight. It leaves your gear vulnerable to known glitches and limits its potential. Staying current is a low-risk, high-reward task that extends your equipment‘s useful life.
Updating firmware is preventative maintenance for the digital soul of your camera. It solves problems early and often unlocks hidden capability.
Make sure to regularly visit your manufacturer’s support website. Check for updates for your specific body and lens models. Follow their instructions carefully, using a fully charged battery.
Performing Basic Functionality and Connection Tests
A quarterly system check-up is a smart habit. It helps you keep camera performance consistent and running smoothly. This proactive check catches gradual degradation you might otherwise miss.
Start with a simple mechanical and optical test protocol. Shoot a series of images at various shutter speeds to check for consistency. Test all autofocus points across the frame for accuracy.
Cycle through every shooting mode on the dial. Test the flash sync and any built-in features. This verifies that core functions are working well.
Next, test all connectivity. Ensure USB and HDMI ports transfer data and video correctly. Pair your camera’s Wi-Fi or Bluetooth with your smartphone app to confirm the link is stable.
If your model has GPS, verify it acquires a signal. For video-capable cameras, record short clips at different resolutions. Watch for overheating warnings or recording glitches.
These tips form a complete diagnostic routine. They help you identify issues before they affect your image quality or require a repair. Scheduling this time ensures your gear is always ready.
Troubleshooting Common Camera Performance Issues
Understanding how to diagnose common performance hiccups saves time and prevents minor issues from growing. A systematic approach helps you identify the root cause quickly. This keeps your equipment running smoothly and your shoots on track.
Diagnosing Focus Problems and Slow Shutter Speeds
Two frequent complaints are autofocus inaccuracy and sluggish shutter response. Isolating the cause is the first step toward a fix.
For focus issues, start by testing multiple lenses. If only one lens is off, the problem is likely there. If all are off, the camera body may need adjustment.
Use your camera‘s AF micro-adjustment feature for fine-tuning. You can also check camera focus on a printed test chart. Ensure the viewfinder’s diopter dial is set correctly for your eyesight.
Slow shutter speeds often have a simple explanation. First, verify you’re not in Bulb or a custom mode with a long exposure set.
Listen closely to the shutter sound. A healthy mechanism has a crisp, consistent snap. Any grinding, hesitation, or irregular noise signals a mechanical fault.
Test in manual mode at a known speed like 1/125s. Compare the result to another camera or light meter. A significant exposure mismatch points to an internal timing issue.
These performance problems can stem from a worn shutter or a dirty mirror damper. Both typically require professional service to correct and prevent further damage.
Addressing Error Messages and Connectivity Glitches
When an error code appears, don’t panic. Start with the universal first step for electronic equipment.
Power down the camera. Remove the battery and memory card. Wait a moment, then reinsert them and power back on. This often clears temporary glitches.
For a specific error code, consult your camera manual or the manufacturer’s website. Understanding the code’s severity helps you decide on the next action.
Persistent messages like “lens error” or “shutter error” are serious. They strongly indicate that professional diagnostic service is required. Attempting a DIY repair on these complex parts can cause more damage.
Wi-Fi or Bluetooth failures are common connectivity issues. On your phone or tablet, go to settings and “forget” the camera connection.
Next, reinstall the manufacturer’s companion app. Finally, re-pair the devices from scratch. This process resets the communication link.
“If a basic reset doesn’t clear an error, it’s time for a pro. Forcing the equipment to work can turn a small repair into a major one.”
Following these tips helps you catch problems early. Timely diagnosis protects your image quality and your gear’s long-term performance. It is a key part of proactive camera care.
Empowering Your Photography Through Consistent Care
Consistent care transforms your camera from a mere tool into a reliable creative partner. This camera maintenance routine is built on simple pillars: regular cleaning, proper storage, a scheduled check-up, and knowing when to seek expert help.
These habits directly answer the core question. They deliver image quality you can trust and performance that never falters. Your equipment will last longer, protecting your investment.
This care is not a chore. It builds a respectful relationship with your gear. A well-maintained camera gives you confidence, removing technical doubt.
You can focus entirely on creativity and composition. The initial time spent learning these practices is a long-term savings. It prevents costly fixes and missed shots.
Follow this guide to take control of your gear’s health. Make sure your camera is always ready to capture every moment. This proactive camera care keeps your photography working well for years.