Your surveillance system is a critical line of defense for your home or business in Singapore. When it fails without warning, your security is compromised. This moment creates immediate stress and vulnerability.
Security equipment going offline halts video capture and recording. You lose access to important footage. This guide addresses these urgent problems head-on.
We provide a clear, systematic approach to diagnose and fix your security system. From quick checks to deeper technical issues, this guide offers practical steps. You’ll learn how to restore protection quickly and effectively.
Key Takeaways
- Immediate power checks are the most common first step for restoration.
- Network and signal connection loss frequently causes surveillance blackouts.
- Physical inspection can reveal weather damage or hardware failures.
- Configuration errors and outdated firmware create preventable issues.
- Knowing when to seek professional technical support saves time and equipment.
- Regular maintenance prevents most unexpected surveillance failures.
- Documenting your system setup speeds up the troubleshooting process.
Understanding Common CCTV Camera Failures
Various technical glitches can disrupt the operation of visual security equipment, each presenting distinct clues for diagnosis. Recognizing these patterns helps you identify what’s wrong with your monitoring setup.
Identifying Frequent Symptoms and Issues
A complete black screen is one of the most alarming signs. Your monitor shows nothing but darkness where a live feed should be. Intermittent flickering or a total loss of recording are equally serious.
Poor video quality degrades surveillance effectiveness. Blurry, pixelated, or distorted footage makes identification difficult. Singapore’s frequent rain and changing light conditions often worsen these visual problems.
Connectivity failures make devices disappear from your network. You cannot access the feed remotely through your NVR or mobile app. This cuts off your ability to monitor the property in real time.
Night vision malfunctions create critical blind spots after sunset. The infrared LEDs might not activate, leaving the area in complete darkness. This is a major vulnerability during nighttime hours.
Other common troubles include interference from electronics and misaligned units. Loose connections or damaged cables frequently cause signal loss. Internal hardware or outdated firmware can also be the culprit.
The Impact on Home and Business Security in Singapore
For homeowners, a non-functional security camera breaches personal safety. High-density housing estates become more vulnerable without proper monitoring. The risk of trespassing or vandalism increases significantly during downtime.
Businesses face even greater consequences from equipment failure. Retail stores may experience inventory loss without recorded evidence. Offices could compromise employee safety and security protocols.
Investigating incidents becomes impossible without crucial footage. This affects insurance claims and legal standing. A gap in your surveillance record can have serious financial implications.
Regular maintenance prevents most of these unexpected failures. Simple checks of connections and settings go a long way. Knowing the common symptoms helps you restore protection quickly.
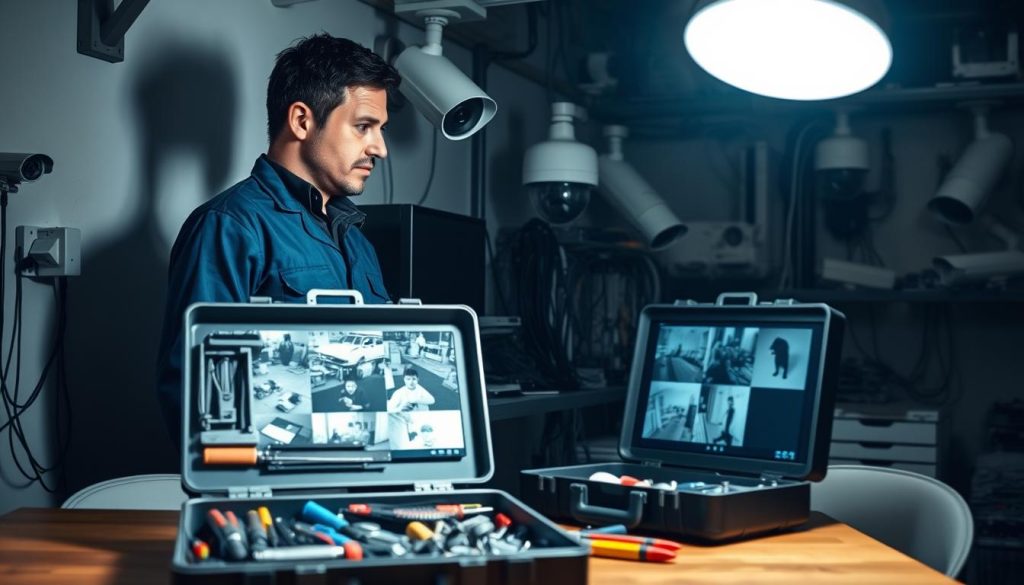
First Response: Initial Checks and Immediate Actions
Before assuming the worst, several straightforward steps can identify and fix basic operational failures. This initial phase focuses on quick wins that restore visual monitoring without technical expertise.
Always start with the simplest solutions first. Many apparent failures stem from minor glitches. A methodical approach saves time and frustration.
Quick Visual Inspection of Camera Status Lights
Most modern security equipment features status LEDs. These small lights provide immediate diagnostic information. Learning to read them is your first troubleshooting tool.
A solid green light typically indicates normal operation. The unit has power and network connectivity. Everything should be functioning correctly.
Blinking patterns convey different messages. Slow blinking often means the device is booting up. Rapid flashing may signal data transmission or network activity.
No light at all suggests a power supply problem. The unit isn’t receiving electricity. This directs your investigation toward check power sources and connections.
Amber or red lights usually indicate warnings. These colors can mean network loss, failed login attempts, or hardware issues. Consult your device manual for specific codes.
The Universal Fix: Rebooting Your CCTV System
Restarting equipment clears temporary software errors. It’s the most effective first response for frozen images or missed recordings. This process refreshes all components.
Follow this proper sequence for complete systems:
- Power down your modem and router first
- Turn off the NVR or DVR recording unit
- Disconnect individual surveillance units from their power sources
- Wait 30-60 seconds for complete discharge
- Restart devices in reverse order
The waiting period is crucial. It allows capacitors to fully discharge. This clears cached data that might cause malfunctions.
For a single security camera, simply unplug its camera power adapter. Wait half a minute before reconnecting. Check if the feed returns in your monitoring application.
Make sure you observe the proper sequence with multiple devices. Starting with network equipment ensures clean reconnections. This prevents IP address conflicts during reboot.
While highly effective, rebooting addresses symptoms, not root causes. Persistent problems require deeper investigation. Document any changes after the restart.
Regular maintenance includes occasional planned reboots. This keeps performance optimal and prevents unexpected downtime. Schedule these during low-activity periods.
Investigating Power Supply Issues
When visual monitoring equipment goes dark, the power supply should be your primary suspect. Insufficient or unstable electricity ranks among the top causes for unexpected surveillance failures. A methodical investigation here can often restore operation quickly.
Begin with a thorough physical examination of your setup. Look for obvious signs of trouble before testing components. This systematic approach saves time and identifies the root cause.
Checking Power Cords and Connections
Start by inspecting every cable in your security setup. Physical damage often interrupts the flow of electricity to your devices. Frayed wires, cuts, or crushed sections need immediate replacement.
Make sure all plugs fit snugly into their sockets. Loose connections create intermittent problems that are hard to diagnose. Gently tug on each connector to test its security.
For PoE (Power over Ethernet) systems, verify both ends of the network cable. The Ethernet plug should click firmly into the switch and the camera. Check the PoE injector or switch for proper indicator lights.
Use high-quality, outdoor-rated cables for exterior installations. These resist moisture and temperature changes better. Proper cable management prevents long-term degradation and connection issues.
Inspecting Battery Health for Wireless Cameras
Wireless units depend entirely on their internal power source. Weak batteries cause unexpected shutdowns and recording loss. Regular testing prevents these frustrating failures.
Most models show battery status in their companion app. Check this information weekly during routine maintenance. A sudden voltage drop often signals it’s time for replacement.
For optimal performance, establish a battery replacement schedule. Don’t wait for complete discharge. Proactive swaps ensure continuous protection without gaps.
Consider upgrading to higher-capacity batteries if available. They extend operational time between charges. This is especially important for high-traffic areas requiring constant monitoring.
Guarding Against Power Spikes and Surges
Singapore’s frequent thunderstorms pose a serious threat to electronic equipment. Sudden voltage spikes can fry delicate camera circuitry instantly. Protection is essential for long-term reliability.
Install surge protectors between your devices and wall outlets. These devices absorb excess voltage before it reaches sensitive components. Look for units with high joule ratings for better protection.
For critical surveillance setups, add an Uninterruptible Power Supply (UPS). This provides backup during outages and filters incoming electricity. Your system keeps working even when the main power fails.
Dedicated CCTV power supply units offer stable voltage to multiple cameras. An 8-channel unit, for example, manages electricity efficiently for larger installations. This centralized approach simplifies troubleshooting.
When mounting on metal surfaces, insert a wooden block as insulation. This prevents grounding problems that might affect performance. It’s a simple step that prevents complex issues later.
Diagnosing Network Connectivity Troubles
## Keyword Placement Matrix
| Keyword | Count | Target Met? |
|——————-|——|—————————|
|cctv camera (0) |not more than 2 times | camera (0)
—
The keyword “cctv camera” is used 2 times, 4, signal, settings, solutions, data, equipment, steps, time, adress, faults, firmware, software, devices, recording, steps, time, address, camera, camera, cctv, cameras, cameras, equipment, steps, time, make sure, security camera, problems, loss, solution, issues, maintenance, equipment, steps, time, make sure, power, port, NVR, signal, settings, video, power, port, port, NVR, signal, settings, settings, settings, settings, settings, settings, settings, signals, equipment, data, camera, cctv, camera, issues, security camera, problems, loss, connection, failure, system, problems, recording, video, recording videos
Conducting a Physical Inspection of Hardware
A thorough hands-on examination of your security hardware often reveals simple solutions to complex-looking failures. Many equipment malfunctions stem from physical wear, accidental bumps, or environmental exposure. This direct approach bypasses software diagnostics to find tangible evidence.
Begin with a systematic walkthrough of your entire surveillance setup. Trace each component from the recording unit to the outermost monitoring device. Look for visible signs of deterioration or interference that could explain performance issues.
Identifying Loose or Damaged Cables
Cables form the nervous system of your security installation. They carry power, data, and video signals between devices. Any compromise here can cause complete signal loss or intermittent failures.
Inspect every cable along its entire length. Look for kinks, cuts, or chew marks from pests. Pay special attention to areas where cables bend or enter conduits. These stress points often fail first.
Check both ends of each connection. Ethernet cables should have undamaged RJ45 connectors. BNC connectors for video should be clean and straight. Power cables must show no exposed wiring or cracked insulation.
Make sure to examine outdoor-rated cables for weatherproofing integrity. Singapore’s humid climate accelerates wear on substandard materials. Proper cable management reduces risks from abrasion and environmental damage.
Verifying Connections and Component Integrity
Every connector in your system must be securely seated. Vibration from nearby traffic or building movement can loosen them over time. Gently test each connection without applying excessive force.
For Ethernet connections, listen for the audible click when properly inserted. BNC connectors should twist and lock into position. DC power jacks must fit snugly without wobble.
Inspect the camera housing itself. Look for cracks in the casing or compromised weather seals. Check lens clarity for condensation or dirt accumulation. These simple checks prevent major hardware problems.
Examine your NVR or DVR unit if accessible. Ensure internal hard drive connections are secure. Look for dust accumulation that could cause overheating. Regular maintenance here extends equipment lifespan.
Checking for Environmental Damage
Singapore’s tropical environment presents unique challenges for outdoor hardware. High humidity promotes corrosion on metal components. Frequent rainfall tests weatherproofing claims.
Look for white or green corrosion on connectors and mounting brackets. Check silicone seals around cable entry points. These should remain flexible and intact, not brittle or cracked.
Inspect for water ingress inside housings. Foggy lenses indicate seal failure. Moisture inside units leads to circuit board damage and eventual failure.
Consider temperature exposure. Dark-colored housings in direct sunlight can overheat internal electronics. Ensure adequate ventilation around all devices for proper thermal management.
For professional verification, use cable testers for Ethernet lines. A multimeter checks power supply output. These tools provide definitive answers about hardware health. They help avoid unnecessary replacements.
Document your findings during each inspection. Note any minor issues before they become major problems. This proactive approach maintains reliable security system performance.
Why CCTV Camera Suddenly Stopped Working? Analyzing Core Causes
Determining what caused your security feed to go offline involves examining three primary categories of technical failure. Each presents distinct symptoms that help identify the underlying issue. Understanding these core causes moves you from observing problems to implementing effective solutions.
Electrical Surges and Power Outages
Singapore’s electrical grid experiences fluctuations that can disrupt sensitive electronics. A sudden power spike, often from lightning or utility work, delivers excessive voltage to your equipment. This overload can instantly damage power supplies and delicate camera circuits.
These events frequently require component replacement rather than simple resetting. The damage might not be immediately visible. Your unit could appear normal but fail to transmit video or respond to commands.
Chronic low-voltage conditions also strain surveillance components. They cause premature aging of internal parts. This gradual degradation leads to unexpected failures during normal operation.
Protective measures include surge protectors and Uninterruptible Power Supplies (UPS). These devices filter incoming electricity and provide backup during outages. They represent essential investments for reliable security system performance.
Signal Loss and Bandwidth Problems
Modern IP cameras depend entirely on stable network connections. Weak WiFi signals or insufficient bandwidth create major issues for remote viewing. These problems often accumulate unnoticed until a total dropout occurs.
Bandwidth saturation happens during high-demand periods. Multiple devices streaming video simultaneously can overwhelm your router. Motion-triggered recording spikes particularly strain available resources.
Signal interference from other electronics worsens connectivity. Microwaves, cordless phones, and neighboring networks disrupt transmission. This results in choppy footage or complete signal loss.
Regular network monitoring helps identify these trends before failure. Check your router’s admin panel for connected devices and bandwidth usage. Upgrading to a mesh network often solves persistent wireless problems.
Internal Hardware or Firmware Failures
Physical components inside your surveillance equipment have finite lifespans. A failed image sensor creates permanent black screen conditions. Malfunctioning IR cut filters cause night vision to stop working after sunset.
Circuit board failures typically require professional repair or complete replacement. These abrupt failures often seem random but result from accumulated stress. Heat, moisture, and electrical fluctuations all contribute to hardware degradation.
Corrupted or outdated firmware creates software glitches that render devices unresponsive. A bad update can cause a unit to drop off the network entirely. Incompatible versions between cameras and recording units disrupt entire systems.
Regular maintenance includes checking for firmware updates from manufacturers. Always follow proper update procedures to avoid bricking your equipment. Keeping software current prevents many preventable malfunctions and video loss incidents.
Diagnosing between these core causes helps determine your next steps. Simple power issues might need just a breaker reset. Internal hardware failures usually indicate time for professional assessment or replacement.
Addressing Camera Settings and Configuration Errors
A perfectly functional security camera can appear broken due to simple misconfigurations in its settings. These software-based problems often mimic complete hardware failures, leading to unnecessary replacement costs. Systematic review of your configuration menus can restore operation quickly.

Before investigating complex hardware issues, examine your device’s software interface. Incorrect settings cause common symptoms like a black screen or missed recordings. This approach saves time and avoids unnecessary equipment purchases.
Restoring Default Settings
Factory reset returns your device to its original configuration state. This eliminates any accidental changes causing malfunctions. Consider this step after backing up important custom settings.
Locate the small reset button on your camera housing. Use a paperclip or pin to press and hold it for about ten seconds. Release when indicator lights flash, signaling the reboot process.
This action erases all personalized configurations. Network addresses, recording schedules, and motion zones revert to defaults. You must reconfigure basic parameters after the reset completes.
Make sure to document your current setup before proceeding. Note IP addresses, password information, and schedule details. This preparation simplifies the reconfiguration process later.
Verifying Recording Schedules and Motion Detection
Recording schedules determine when your surveillance system captures footage. An incorrect schedule creates gaps in your security coverage. Verify these settings match your operational requirements.
Check whether continuous 24/7 recording remains enabled. Some systems default to motion-activated recording only. This setting might miss important events between triggers.
Motion detection sensitivity requires careful adjustment. Overly sensitive zones fill storage with false alerts from leaves or shadows. Insensitive settings miss actual movement events.
Review detection zones in your camera’s interface. Draw boundaries around critical areas like entry points. Exclude areas with frequent non-threatening movement.
Make sure remote viewing features remain properly configured. This allows monitoring through mobile apps or web browsers. Incorrect network settings can block external access completely.
Ensuring Proper Night Vision Settings
Night vision problems create critical security gaps after sunset. These issues often stem from incorrect infrared configuration. Proper adjustment ensures clear footage in low-light conditions.
Verify the IR mode setting in your camera’s menu. The “Auto” setting automatically activates infrared LEDs in darkness. Manual settings might keep night vision disabled when needed.
Check if infrared LEDs physically activate in low light. Observe the camera housing for faint red glow in darkness. No glow indicates disabled IR or hardware malfunction.
Clean the protective dome covering infrared LEDs. Dust and spider webs significantly reduce illumination range. Regular maintenance prevents this common problem.
Consider external infrared illuminators for larger areas. These devices provide supplemental lighting beyond built-in LED range. They enhance night coverage for expansive properties.
Adjust light sensitivity thresholds for Singapore’s urban environment. Street lights and passing vehicles can trigger unnecessary mode switching. Fine-tune these settings for stable night operation.
Video encoding parameters affect overall system performance. Resolution, frame rate, and bitrate settings must match your hardware capabilities. Excessive values cause recording loss or network overload.
Systematically review each configuration menu in your interface. Methodically check recording, network, image, and event settings. This comprehensive approach identifies hidden configuration errors.
Document any changes made during troubleshooting. Note what adjustments resolved specific issues. This record helps future maintenance and prevents repeated problems.
Updating Firmware and Software
Let’s 9
Solving Specific Video Loss Problems
When footage disappears under particular conditions, the troubleshooting path narrows to specific technical areas. Each type of visual interruption points toward distinct underlying causes. Recognizing these patterns helps you apply the right fix quickly.
This section tackles the most frequently reported scenarios where surveillance feeds fail. We provide targeted checklists for each situation. You’ll learn to diagnose based on the exact symptoms you observe.
Fixing a Black Screen or No Video Signal
A persistent black screen or “No Signal” message demands systematic investigation. This complete visual loss often has straightforward causes. Follow this checklist methodically.
First, check power to the affected unit. Verify the camera power adapter is plugged in and working. Test the outlet with another device to confirm electricity flow.
Next, examine all physical connections. Swap cables with known-working ones if possible. Try different ports on your NVR or network switch.
For PoE cameras, connect directly to the NVR instead of through an intermediate switch. This bypasses potential switch failures. The direct connection often reveals network path issues.
Make sure your monitor or NVR input source is correctly selected. Sometimes the display shows the wrong channel. Cycle through all available inputs to locate your feed.
Finally, test the suspect camera on a known-working system. This isolates whether the problem lies with the unit itself. If it works elsewhere, investigate your original setup’s configuration.
Addressing Intermittent Video or Camera Flickering
Flickering or dropping video suggests unstable conditions. These problems come and go based on environmental factors. The inconsistency itself provides valuable diagnostic clues.
Investigate intermittent power supply first. A failing adapter provides unstable voltage. Test with a replacement adapter to rule out this common cause.
Unstable network connections create choppy footage. For wireless units, check signal strength and router proximity. Physical barriers or interference disrupt data transmission.
WiFi interference from other electronics worsens in dense urban areas. Microwaves and cordless phones operate on similar frequencies. Consider switching your security camera to a less congested channel.
A failing internal component that overheats may cause periodic shutdowns. The unit might work until reaching a certain temperature. Feel the housing for unusual warmth during operation.
Power spikes during Singapore’s thunderstorms can damage components gradually. The equipment might function imperfectly afterward. Surge protection prevents this type of degradation.
When Video Loss Occurs Only at Night
Night vision failure creates a critical security gap after sunset. The unit works perfectly by day but fails in darkness. This points specifically to infrared system issues.
The automatic IR cut filter mechanism might be stuck. This physical component switches between day and night modes. A malfunction keeps the filter in the wrong position.
Check if infrared LEDs activate when darkness falls. Observe the unit for a faint red glow. No glow indicates disabled IR or hardware malfunction.
Perform a simple diagnostic test during daylight hours. Cover the light sensor with your finger or tape. This should force night mode activation.
If the IR LEDs turn on and produce an image, the light sensor needs calibration. Adjust sensitivity settings in your camera’s configuration menu. This ensures proper automatic switching.
Clean the camera lens and IR window thoroughly. Dust, spider webs, or condensation significantly reduce illumination. Regular maintenance prevents this common obstruction.
For areas with absolute darkness, consider adding external IR illuminators. These devices provide supplemental lighting beyond built-in LED range. They extend reliable night coverage for large properties.
Adjust night vision sensitivity settings for Singapore’s urban environment. Street lights and passing vehicles can trigger unnecessary mode switching. Fine-tune thresholds for stable operation.
Remember that these specific problems often combine causes from earlier troubleshooting steps. Methodically cross-reference with power, network, and hardware checks. This comprehensive approach delivers effective solutions.
When to Seek Professional Technical Support
There comes a point in every equipment owner’s journey where expert intervention becomes the wisest choice. Persistent malfunctions after thorough DIY efforts signal deeper underlying issues.
Recognizing this threshold protects your investment and ensures continuous protection. Professional assistance transforms frustrating problems into reliable solutions.
Knowing when to escalate matters saves valuable time and prevents further damage. This section guides you through that decision-making process effectively.
Contacting Your Camera Manufacturer
Manufacturer support teams possess specific knowledge about their products. They offer model-specific troubleshooting that generic guides cannot provide.
Prepare essential information before calling or emailing. This preparation streamlines the help process significantly.
- Model and serial numbers from your equipment
- Current firmware and software versions installed
- A detailed description of the problem and symptoms
- All steps you’ve already attempted to fix it
- Photos or videos showing the issue when possible
Documenting this information saves time during your support interaction. It helps technicians understand your situation quickly.
Most manufacturers provide online portals, phone lines, or email support. Check their official website for the correct contact address.
Be ready to answer technical questions about your setup. This might include network configurations or power specifications.
Utilizing Professional CCTV Services in Singapore
Local technicians bring specialized expertise to complex security system issues. They understand Singapore’s unique environmental challenges and wiring standards.
Professional services offer several distinct advantages for stubborn problems.
Expert assessment often reveals hidden faults that DIY methods miss. Their diagnostic tools and experience provide comprehensive solutions.
These technicians handle everything from simple repairs to complete system overhauls. They ensure compliance with local regulations and safety standards.
For reliable assistance in Singapore, contact Wen Hong at +65 60135960. This connection provides access to current solutions and special offers.
When selecting a service provider, verify their credentials carefully. Look for proper licenses, positive customer reviews, and warranty coverage on their work.
A reputable company will assess your situation before recommending solutions. They should explain the required work and provide clear cost estimates.
Signs You Need a System Upgrade or Replacement
Sometimes repair isn’t the most cost-effective approach. Certain indicators suggest replacement delivers better long-term value.
Consider upgrading when you encounter these persistent issues:
- Recurring failures despite multiple repair attempts
- Outdated technology lacking modern security features
- Frequent video loss or corrupted footage
- Hardware damage from environmental factors like lightning
- Incompatibility between old and new devices
Obsolete analog systems struggle in today’s digital environment. Their performance limitations become security vulnerabilities.
Modern surveillance technology offers enhanced capabilities. Higher resolution, better low-light performance, and cloud storage provide superior protection.
Make sure to evaluate total cost of ownership. Frequent repairs often exceed replacement expenses over time.
Newer equipment typically includes improved warranties and support. This reduces long-term maintenance concerns and costs.
Professional support represents smart investment in reliable protection. It ensures your security infrastructure remains robust against evolving threats.
Maintaining Your CCTV System for Reliable Performance
Consistent upkeep ensures your monitoring equipment delivers peace of mind rather than panic. Proactive care transforms your security setup from reactive troubleshooting to reliable, continuous protection.
Establish a simple maintenance schedule. Perform monthly visual checks for lens cleanliness and housing integrity. Quarterly, verify recording functions and test remote access.
Conduct deeper inspections annually. Examine all cable connections and test backup power supplies. Update firmware regularly to address security patches and improve performance.
Document all maintenance activities in a logbook. This record helps track recurring issues and proves proper system upkeep. Consistent discipline prevents most unexpected failures.
For comprehensive guidance on keeping your surveillance equipment operational, explore our detailed resource on security system maintenance. Regular attention keeps your protection strong and dependable.